
SSL证书通过在客户端浏览器和Web服务器之间建立一条SSL安全通道(Secure socket layer(SSL)安全协议是由Netscape Communication公司设计开发。该安全协议主要用来提供对用户和服务器的认证;对传送的数据进行加密和隐藏;确保数据在传送中不被改变,即数据的完整性,现已成为该领域中全球化的标准。由于SSL技术已建立到所有主要的浏览器和WEB服务器程序中,因此,仅需安装服务器证书就可以激活该功能了),即通过它可以激活SSL协议,实现数据信息在客户端和服务器之间的加密传输,可以防止数据信息的泄露。保证了双方传递信息的安全性,而且用户可以通过服务器证书验证他所访问的网站是否是真实可靠。数位签名又名数字标识、签章 (即 Digital Certificate,Digital ID ),提供了一种在网上进行身份验证的方法,是用来标志和证明网路通信双方身份的数字信息文件,概念类似日常生活中的司机驾照或身份证相似。 数字签名主要用于发送安全电子邮件、访问安全站点、网上招标与投标、网上签约、网上订购、安全网上公文传送、网上办公、网上缴费、网上缴税以及网上购物等安全的网上电子交易活动。
最近一段时间老左在玩SSL证书,其中玩过在黑色星期五期间不到1美元一年购买的Namecheap付费SSL证书,也玩过被很多商家和网友推荐的Let's Encrypt免费SSL证书,对于一般的网站用户或者博客用户来说,对于安装何种加密级别的证书其实都没有多大意义,最为主要的是URL头是一个绿色的小锁就感觉高端大气。
第一步、安装SSL证书到cPanel面板准备工作
我们在准备安装网站实现HTTPS网址加密证书访问之前需要将网站添加到cPanel面板中,实现HTTP可以访问,这个就不用在这里教学了,已经很基础的东西。其次,我们需要通过上面SSL For Free方法获取到证书包,且里面有ca_bundle.crt、certificate.crt、private.key三个文件,我们要准备等会需要用到。
第二步、登录cPanel面板设置添加准备的证书文件
1、登录SSL/TLS 管理器
登录CP面板,我们可以看到上图所示,找到SSL/TLS管理器。
上面的选项很多,这里直接点击管理SSL站点选项。
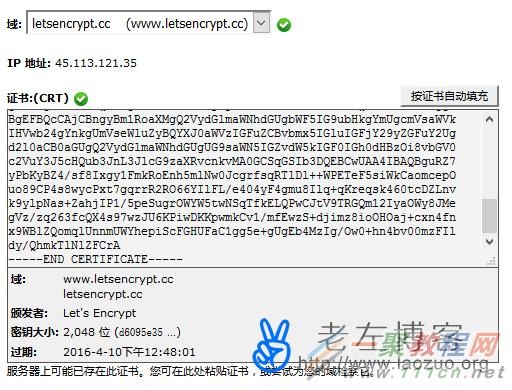
这里我们需要选择已经在CP面板中的站点,也就是我们上面准备好的配置和下载到证书的域名,然后在其中的certificate.crt文件的脚本都复制进来,然后会看到对应的域名选项。
然后将private.key和ca_bundle.crt文件都复制对应的文本框中。点击安装证书,这样可以看到下图。
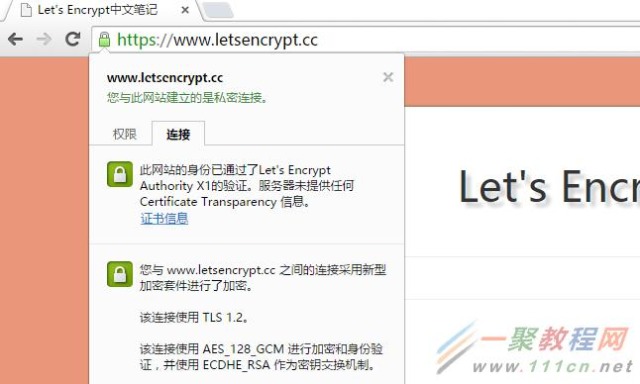
看到这个界面,就表示我们在cpanel面板中部署SSL证书完毕。点击确定之后我们其实就可以用HTTPS地址访问我们的网站。
一来是为了统一用户访问入口,二来规范化网址,所以必须将当前既可以用HTTP访问,也可以用HTTPS访问网站进行一个统一格式。老左需要将全部用HTTP访问的地址跳转到HTTPS地址来。

| 代码如下 | 复制代码 |
|
RewriteCond %{SERVER_PORT} 80
RewriteRule ^(.*)$ https://www.letsencrypt.cc/$1 [R,L] RewriteCond %{HTTP_HOST} ^letsencrypt.cc [NC] RewriteRule ^(.*)$ http://www.letsencrypt.cc/$1 [L,R=301] | |
| 代码如下 | 复制代码 |
|
在线检测工具:https://www.ssllabs.com/
| |

镜像用法
自备证书用法
docker run -d --name=google \
-p 80:80 -p 443:443 \
-v 系统上存放ssl证书的目录:/usr/local/nginx/conf/ssl \
-e PROXY_GOOGLE=On \
-e PROXY_SSL_CRT_KEY=On \
-e PROXY_CRT=你的crt名称 \
-e PROXY_KEY=你的key名称 \
-e PROXY_DOMAIN=你的域名 \
benyoo/nginx_build:proxy_google
系统自签证书用法
docker run -d --name=google \
-p 80:80 -p 443:443 \
-e PROXY_GOOGLE=On \
-e PROXY_DOMAIN=你的域名 \
benyoo/nginx_build:proxy_google
Docker之构建Nginx镜像实现迅速搭建Google反代站点
FROM centos:6.7
MAINTAINER from www.111cn.net by lookback (mondeolove@gmail.com)
RUN yum clean all && \
rpm --import /etc/pki/rpm-gpg/RPM-GPG-KEY-CentOS-* && \
yum install -y epel-release && \
rpm --import /etc/pki/rpm-gpg/RPM-GPG-KEY-EPEL-6 && \
yum makecache && \
yum install -y pcre-devel openssl-devel zlib-devel gd-devel tar gcc wget git
RUN groupadd --system www && \
useradd --system --gid www www && \
mkdir -p {/var/log/wwwlogs,/var/run/nginx,/var/lock}
RUN wget -c http://nginx.org/download/nginx-1.9.5.tar.gz && \
git clone https://github.com/cuber/ngx_http_google_filter_module.git && \
git clone https://github.com/yaoweibin/ngx_http_substitutions_filter_module.git && \
git clone https://github.com/aperezdc/ngx-fancyindex.git
RUN tar xf nginx-1.9.5.tar.gz && \
cd nginx-1.9.5 && \
./configure --prefix=/usr/local/nginx \
--user=www --group=www \
--error-log-path=/var/log/wwwlogs/error.log \
--http-log-path=/var/log/wwwlogs/access.log \
--pid-path=/var/run/nginx/nginx.pid \
--lock-path=/var/lock/nginx.lock \
--with-pcre \
--with-ipv6 \
--with-http_ssl_module \
--with-http_flv_module \
--with-http_v2_module \
--with-http_realip_module \
--with-http_gzip_static_module \
--with-http_stub_status_module \
--with-http_mp4_module \
--with-http_image_filter_module \
--with-http_addition_module \
--http-client-body-temp-path=/usr/local/nginx/client/ \
--http-proxy-temp-path=/usr/local/nginx/proxy/ \
--http-fastcgi-temp-path=/usr/local/nginx/fcgi/ \
--http-uwsgi-temp-path=/usr/local/nginx/uwsgi \
--http-scgi-temp-path=/usr/local/nginx/scgi \
--add-module=../ngx_http_google_filter_module \
--add-module=../ngx_http_substitutions_filter_module \
--add-module=../ngx-fancyindex && \
make -j $(awk '/processor/{i++}END{print i}' /proc/cpuinfo) && make install && \
rm -rf ../{ngx_http*,ngx-fancyindex,nginx-1.9.5*}
ADD nginx.conf /usr/local/nginx/conf/nginx.conf
ADD run.sh /run.sh
RUN chmod +x /run.sh
VOLUME ["/home/wwwroot", "/usr/local/nginx/conf/ssl", "/usr/local/nginx/conf/vhost"]
EXPOSE 80 443
ENTRYPOINT ["/run.sh"]
CMD ["nginx"]
#!/bin/sh
#########################################################################
# File Name: run.sh
# Author: LookBack
# Email: admin#111cn.net
# Version:
# Created Time: 2015年11月17日 星期二 10时29分55秒
#########################################################################
PATH=/bin:/usr/local/nginx/sbin:$PATH
Nginx_Install_Dir=/usr/local/nginx
set -e
if [ -n "$TIMEZONE" ]; then
rm -rf /etc/localtime && \
ln -s /usr/share/zoneinfo/$TIMEZONE /etc/localtime
fi
if [ "${1:0:1}" = '-' ]; then
set -- nginx "$@"
fi
if [ -z "$DATA_DIR" ]; then
DATA_DIR=/home/wwwroot
fi
sed -i "s@/home/wwwroot@$DATA_DIR@" $Nginx_Install_Dir/conf/nginx.conf
mkdir -p ${DATA_DIR}
[ ! -f "$DATA_DIR/index.html" ] && echo '<meta http-equiv="Content-Type" content="text/html; charset=utf-8" />
<h1 style="text-align:center;">
<span style="line-height:1.5;"><span style="color:#337FE5;">Hello world! This Nginx!</span>
</span><span style="line-height:1.5;color:#E53333;">Welcome to use Docker!</span>
</h1>
<h1 style="text-align:center;">
<span style="line-height:1.5;color:#E53333;">^_^┢┦aΡpy </span>
</h1>
' > $DATA_DIR/index.html
chown -R www.www $DATA_DIR
CPU_num=$(awk '/processor/{i++}END{print i}' /proc/cpuinfo)
if [ "$CPU_num" == '2' ];then
sed -i 's@^worker_processes.*@worker_processes 2;\nworker_cpu_affinity 10 01;@' $Nginx_Install_Dir/conf/nginx.conf
elif [ "$CPU_num" == '3' ];then
sed -i 's@^worker_processes.*@worker_processes 3;\nworker_cpu_affinity 100 010 001;@' $Nginx_Install_Dir/conf/nginx.conf
elif [ "$CPU_num" == '4' ];then
sed -i 's@^worker_processes.*@worker_processes 4;\nworker_cpu_affinity 1000 0100 0010 0001;@' $Nginx_Install_Dir/conf/nginx.conf
elif [ "$CPU_num" == '6' ];then
sed -i 's@^worker_processes.*@worker_processes 6;\nworker_cpu_affinity 100000 010000 001000 000100 000010 000001;@' $Nginx_Install_Dir/conf/nginx.conf
elif [ "$CPU_num" == '8' ];then
sed -i 's@^worker_processes.*@worker_processes 8;\nworker_cpu_affinity 10000000 01000000 00100000 00010000 00001000 00000100 00000010 00000001;@' $Nginx_Install_Dir/conf/nginx.conf
else
echo Google worker_cpu_affinity
fi
if [[ -n "$PROXY_GOOGLE" ]]; then
[ -f "${Nginx_Install_Dir}/conf/ssl" ] || mkdir -p $Nginx_Install_Dir/conf/ssl
[ -f "${Nginx_Install_Dir}/conf/vhost" ] || mkdir -p $Nginx_Install_Dir/conf/vhost
if [ -z "$PROXY_DOMAIN" ]; then
echo >&2 'error: missing PROXY_DOMAIN'
echo >&2 ' Did you forget to add -e PROXY_DOMAIN=... ?'
exit 1
fi
if [ -n "$PROXY_SSL_CRT_KEY" ]; then
if [ -z "$PROXY_CRT" ]; then
echo >&2 'error: missing PROXY_CRT'
echo >&2 ' Did you forget to add -e PROXY_CRT=... ?'
exit 1
fi
if [ -z "$PROXY_KEY" ]; then
echo >&2 'error: missing PROXY_KEY'
echo >&2 ' Did you forget to add -e PROXY_KEY=... ?'
exit 1
fi
if [ -f "${Nginx_Install_Dir}/conf/ssl/${PROXY_CRT}" ]; then
echo >&2 'error: missing PROXY_CRT'
echo >&2 " You need to put ${PROXY_CRT} in ssl directory"
exit 1
fi
if [ -f "${Nginx_Install_Dir}/conf/ssl/${PROXY_KEY}" ]; then
echo >&2 'error: missing PROXY_CSR'
echo >&2 " You need to put ${PROXY_KEY} in ssl directory"
exit 1
fi
else
openssl req -new -newkey rsa:2048 -nodes \
-out $Nginx_Install_Dir/conf/ssl/$PROXY_DOMAIN.csr \
-keyout $Nginx_Install_Dir/conf/ssl/$PROXY_DOMAIN.key \
-subj "/C=CN/ST=Shanghai/L=Pudong/O=Legion/OU=DevOps/CN=$PROXY_DOMAIN/emailAddress=admin@111cn.net"
openssl x509 -req -days 365 -in $Nginx_Install_Dir/conf/ssl/$PROXY_DOMAIN.csr \
-signkey $Nginx_Install_Dir/conf/ssl/$PROXY_DOMAIN.key \
-out $Nginx_Install_Dir/conf/ssl/$PROXY_DOMAIN.crt
rm -rf $Nginx_Install_Dir/conf/ssl/$PROXY_DOMAIN.csr
PROXY_KEY=${PROXY_DOMAIN}.key
PROXY_CRT=${PROXY_DOMAIN}.crt
fi
#sed -i '57,87d' $Nginx_Install_Dir/conf/nginx.conf
cat > ${Nginx_Install_Dir}/conf/vhost/google.conf << EOF
server {
listen 80;
server_name $PROXY_DOMAIN;
return 301 https://$PROXY_DOMAIN\$request_uri;
}
server {
listen 443 ssl;
server_name $PROXY_DOMAIN;
ssl on;
ssl_certificate ssl/${PROXY_CRT};
ssl_certificate_key ssl/${PROXY_KEY};
ssl_protocols TLSv1 TLSv1.1 TLSv1.2;
ssl_prefer_server_ciphers on;
ssl_ciphers ALL:!aNULL:!ADH:!eNULL:!LOW:!EXP:RC4+RSA:+HIGH:+MEDIUM;
keepalive_timeout 70;
ssl_session_cache shared:SSL:10m;
ssl_session_timeout 10m;
resolver 8.8.8.8;
location / {
google on;
google_scholar on;
google_language zh-CN;
google_robots_allow on;
}
}
EOF
#mv ${Nginx_Install_Dir}/vhost/{google.conf.stop,google.conf}
fi
exec "$@" -g "daemon off;"
user www www;
worker_processes auto;
error_log /var/log/wwwlogs/error_nginx.log crit;
pid /var/run/nginx.pid;
worker_rlimit_nofile 51200;
events {
use epoll;
worker_connections 51200;
}
http {
include mime.types;
default_type application/octet-stream;
server_names_hash_bucket_size 128;
client_header_buffer_size 32k;
large_client_header_buffers 4 32k;
client_max_body_size 50m;
sendfile on;
tcp_nopush on;
keepalive_timeout 120;
server_tokens off;
tcp_nodelay on;
fastcgi_connect_timeout 300;
fastcgi_send_timeout 300;
fastcgi_read_timeout 300;
fastcgi_buffer_size 64k;
fastcgi_buffers 4 64k;
fastcgi_busy_buffers_size 128k;
fastcgi_temp_file_write_size 128k;
#Gzip Compression
gzip on;
gzip_buffers 16 8k;
gzip_comp_level 6;
gzip_http_version 1.1;
gzip_min_length 256;
gzip_proxied any;
gzip_vary on;
gzip_types
text/xml application/xml application/atom+xml application/rss+xml application/xhtml+xml image/svg+xml
text/javascript application/javascript application/x-javascript
text/x-json application/json application/x-web-app-manifest+json
text/css text/plain text/x-component
font/opentype application/x-font-ttf application/vnd.ms-fontobject
image/x-icon;
gzip_disable "msie6";
#If you have a lot of static files to serve through Nginx then caching of the files' metadata (not the actual files' contents) can save some latency.
open_file_cache max=1000 inactive=20s;
open_file_cache_valid 30s;
open_file_cache_min_uses 2;
open_file_cache_errors on;
server {
listen 80;
server_name -;
root /home/wwwroot;
index index.html index.php index.jsp;
access_log /var/log/wwwlogs/access_nginx.log combined;
location /status {
stub_status on;
auth_basic "WebServer Status";
}
# location ~ .*\.(php|php5)?$ {
# #fastcgi_pass remote_php_ip:9000;
# fastcgi_pass unix:/dev/shm/php-cgi.sock;
# fastcgi_index index.php;
# include fastcgi.conf;
# }
location ~ .*\.(gif|jpg|jpeg|png|bmp|swf|flv|ico)$ {
expires 30d;
}
location ~ .*\.(js|css)?$ {
expires 7d;
}
}
##########################vhost#####################################
include vhost/*.conf;
}